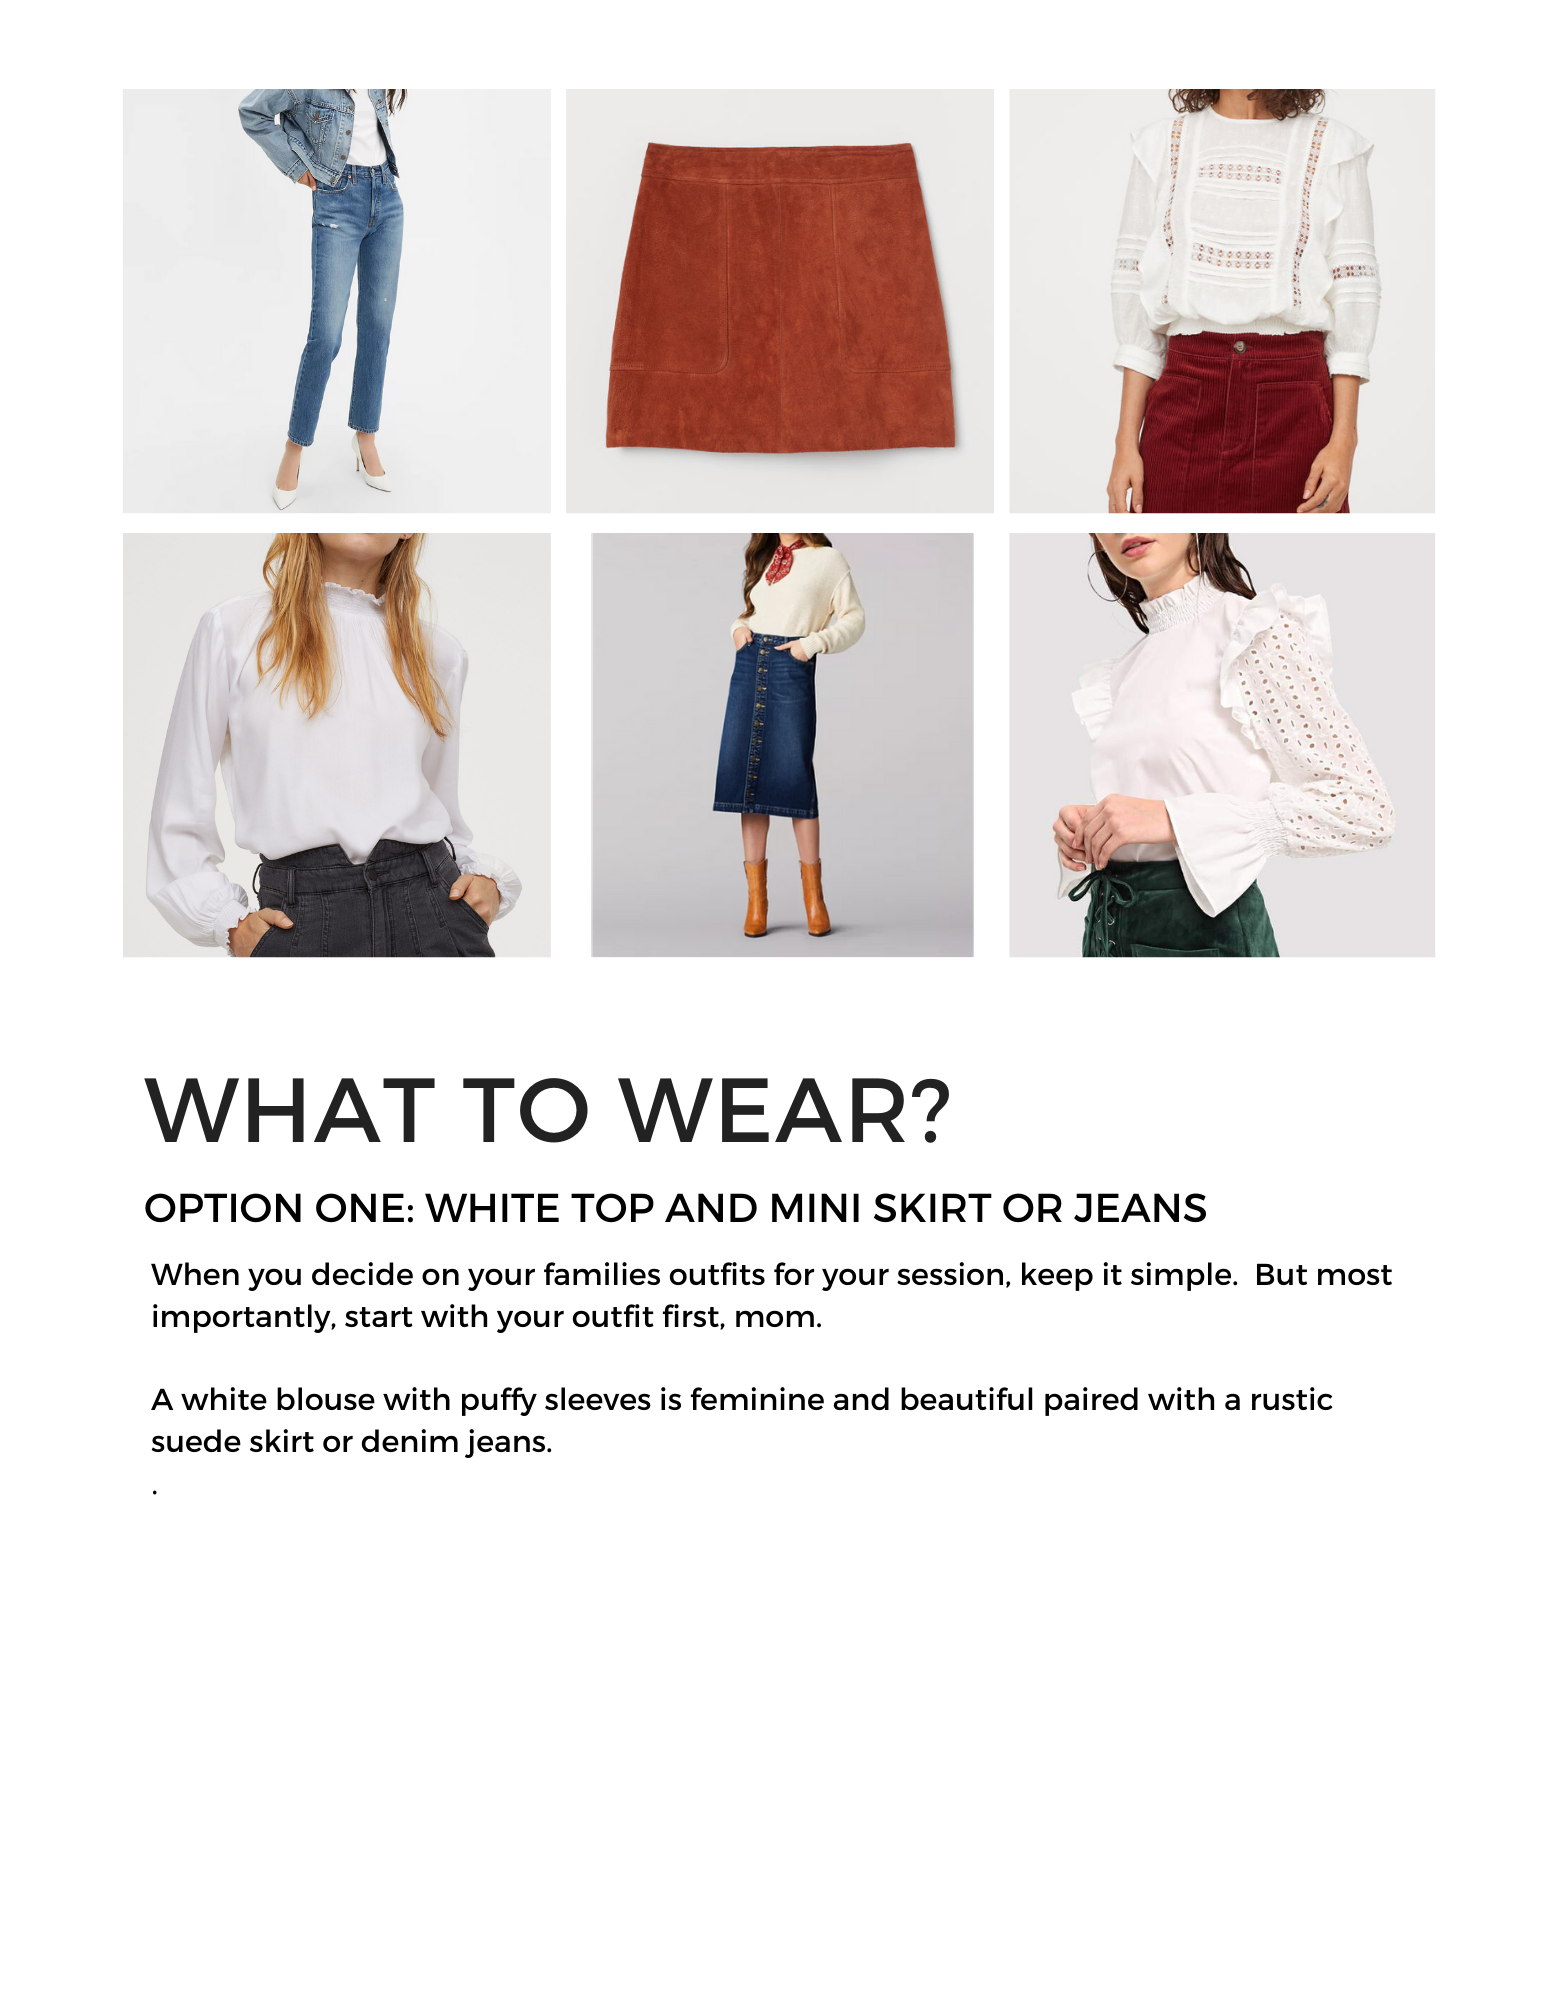
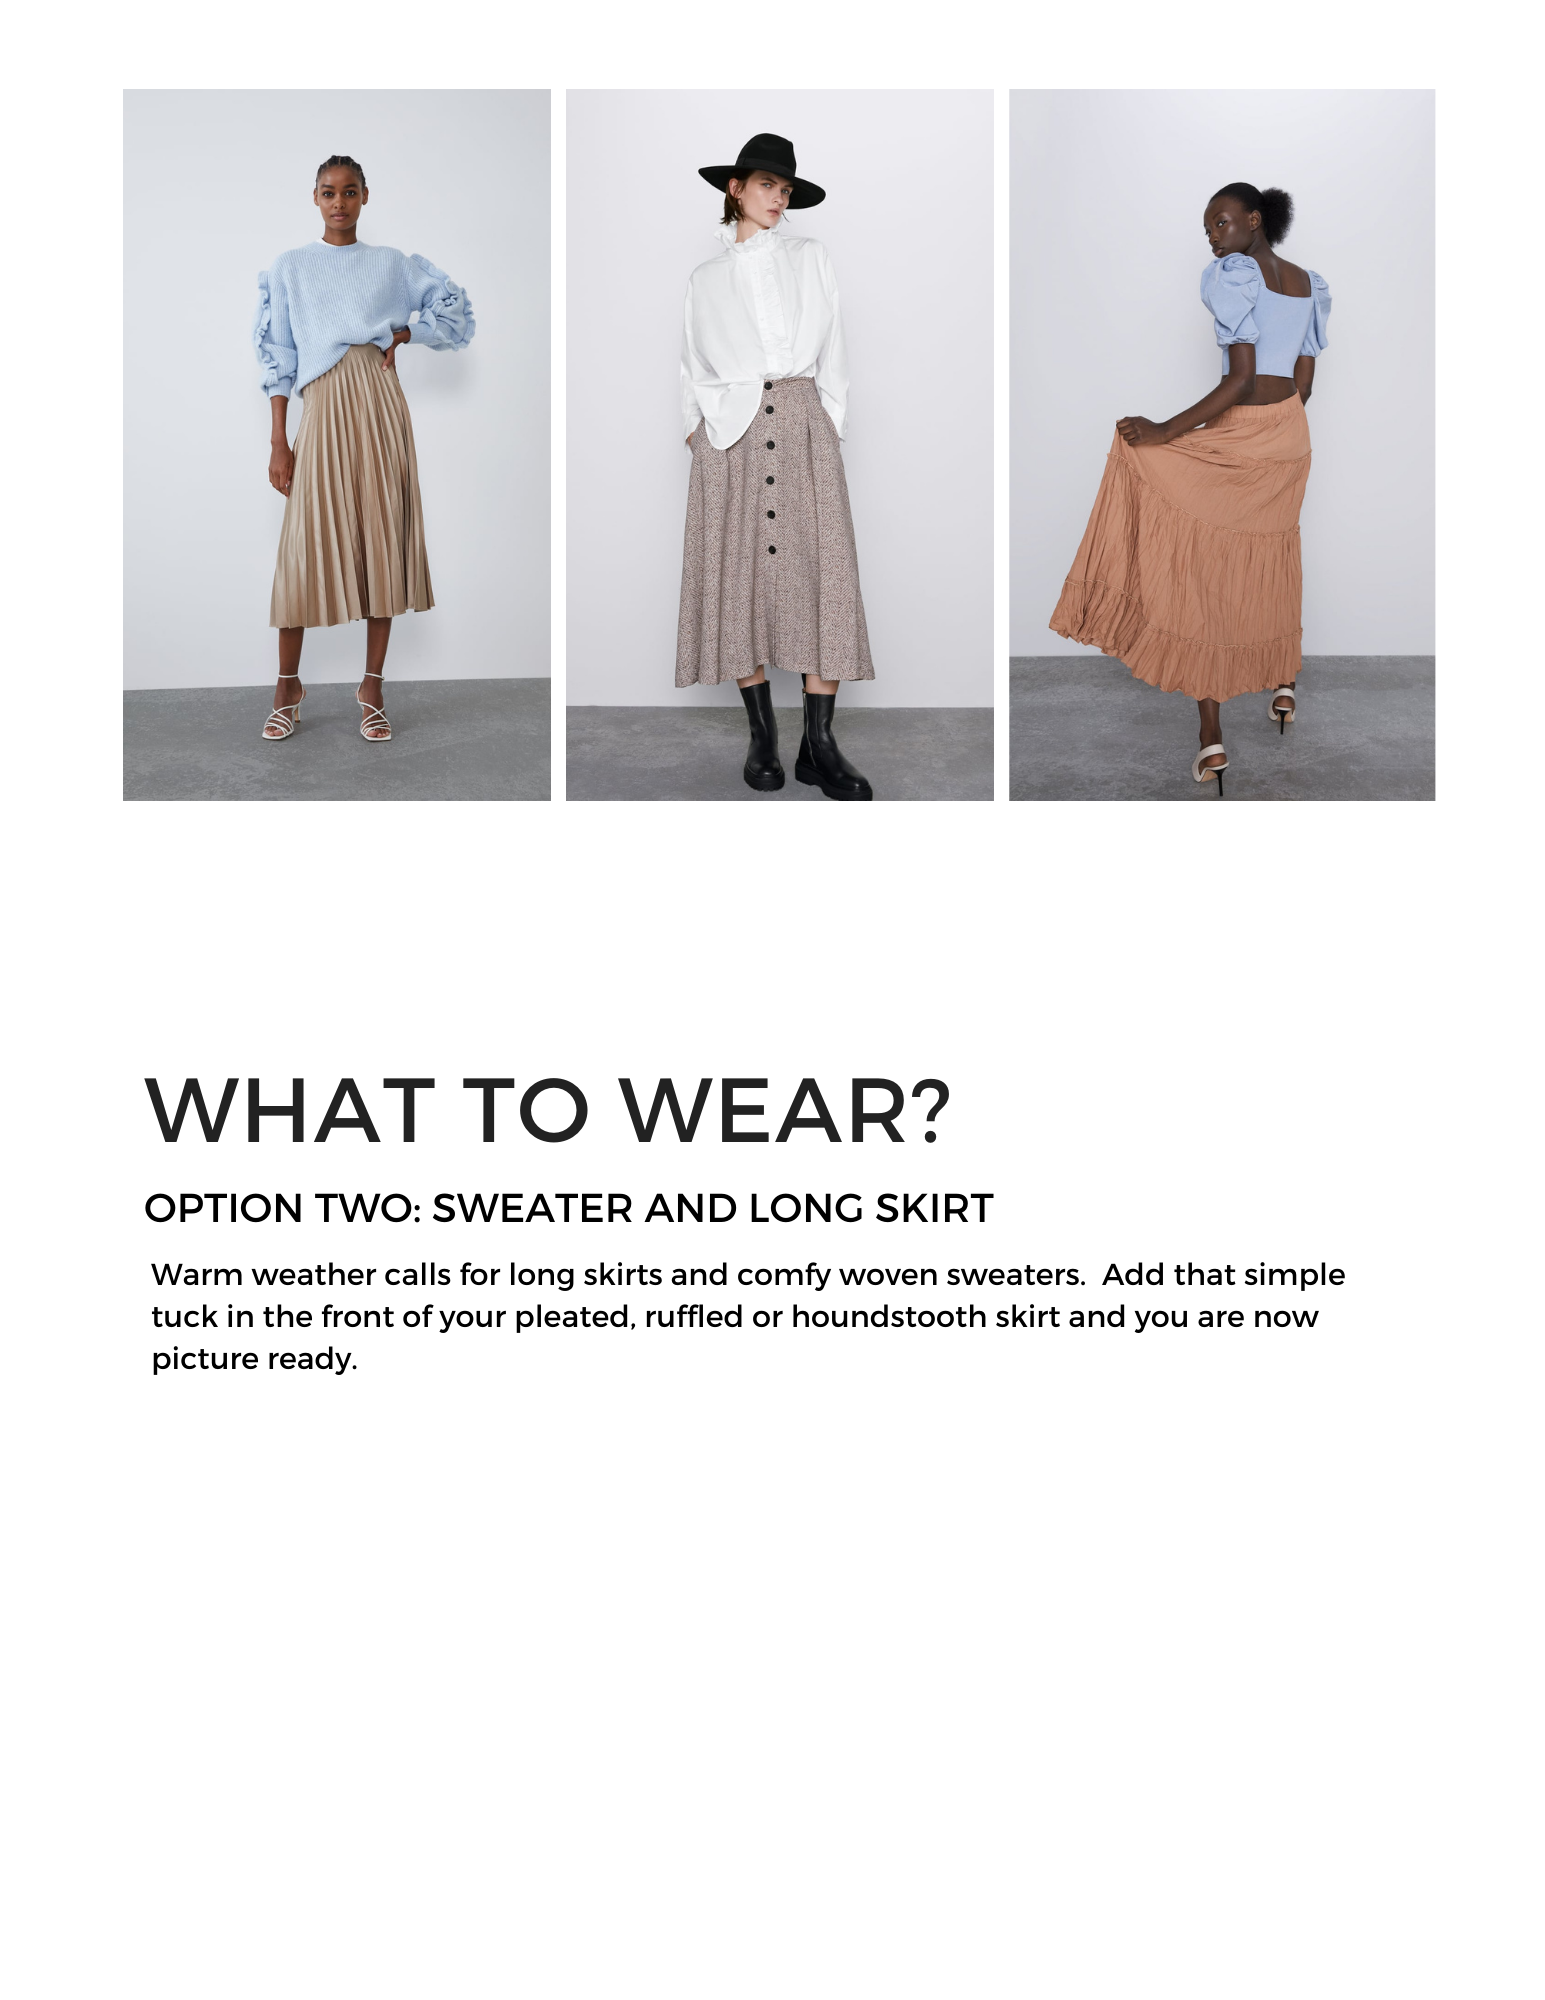
I want to know what you think...

I want to know what you think! Do you imagine my days as a product photographer are all fabulous with creative ideas and perfect execution every time?
⠀⠀⠀⠀⠀⠀⠀⠀⠀
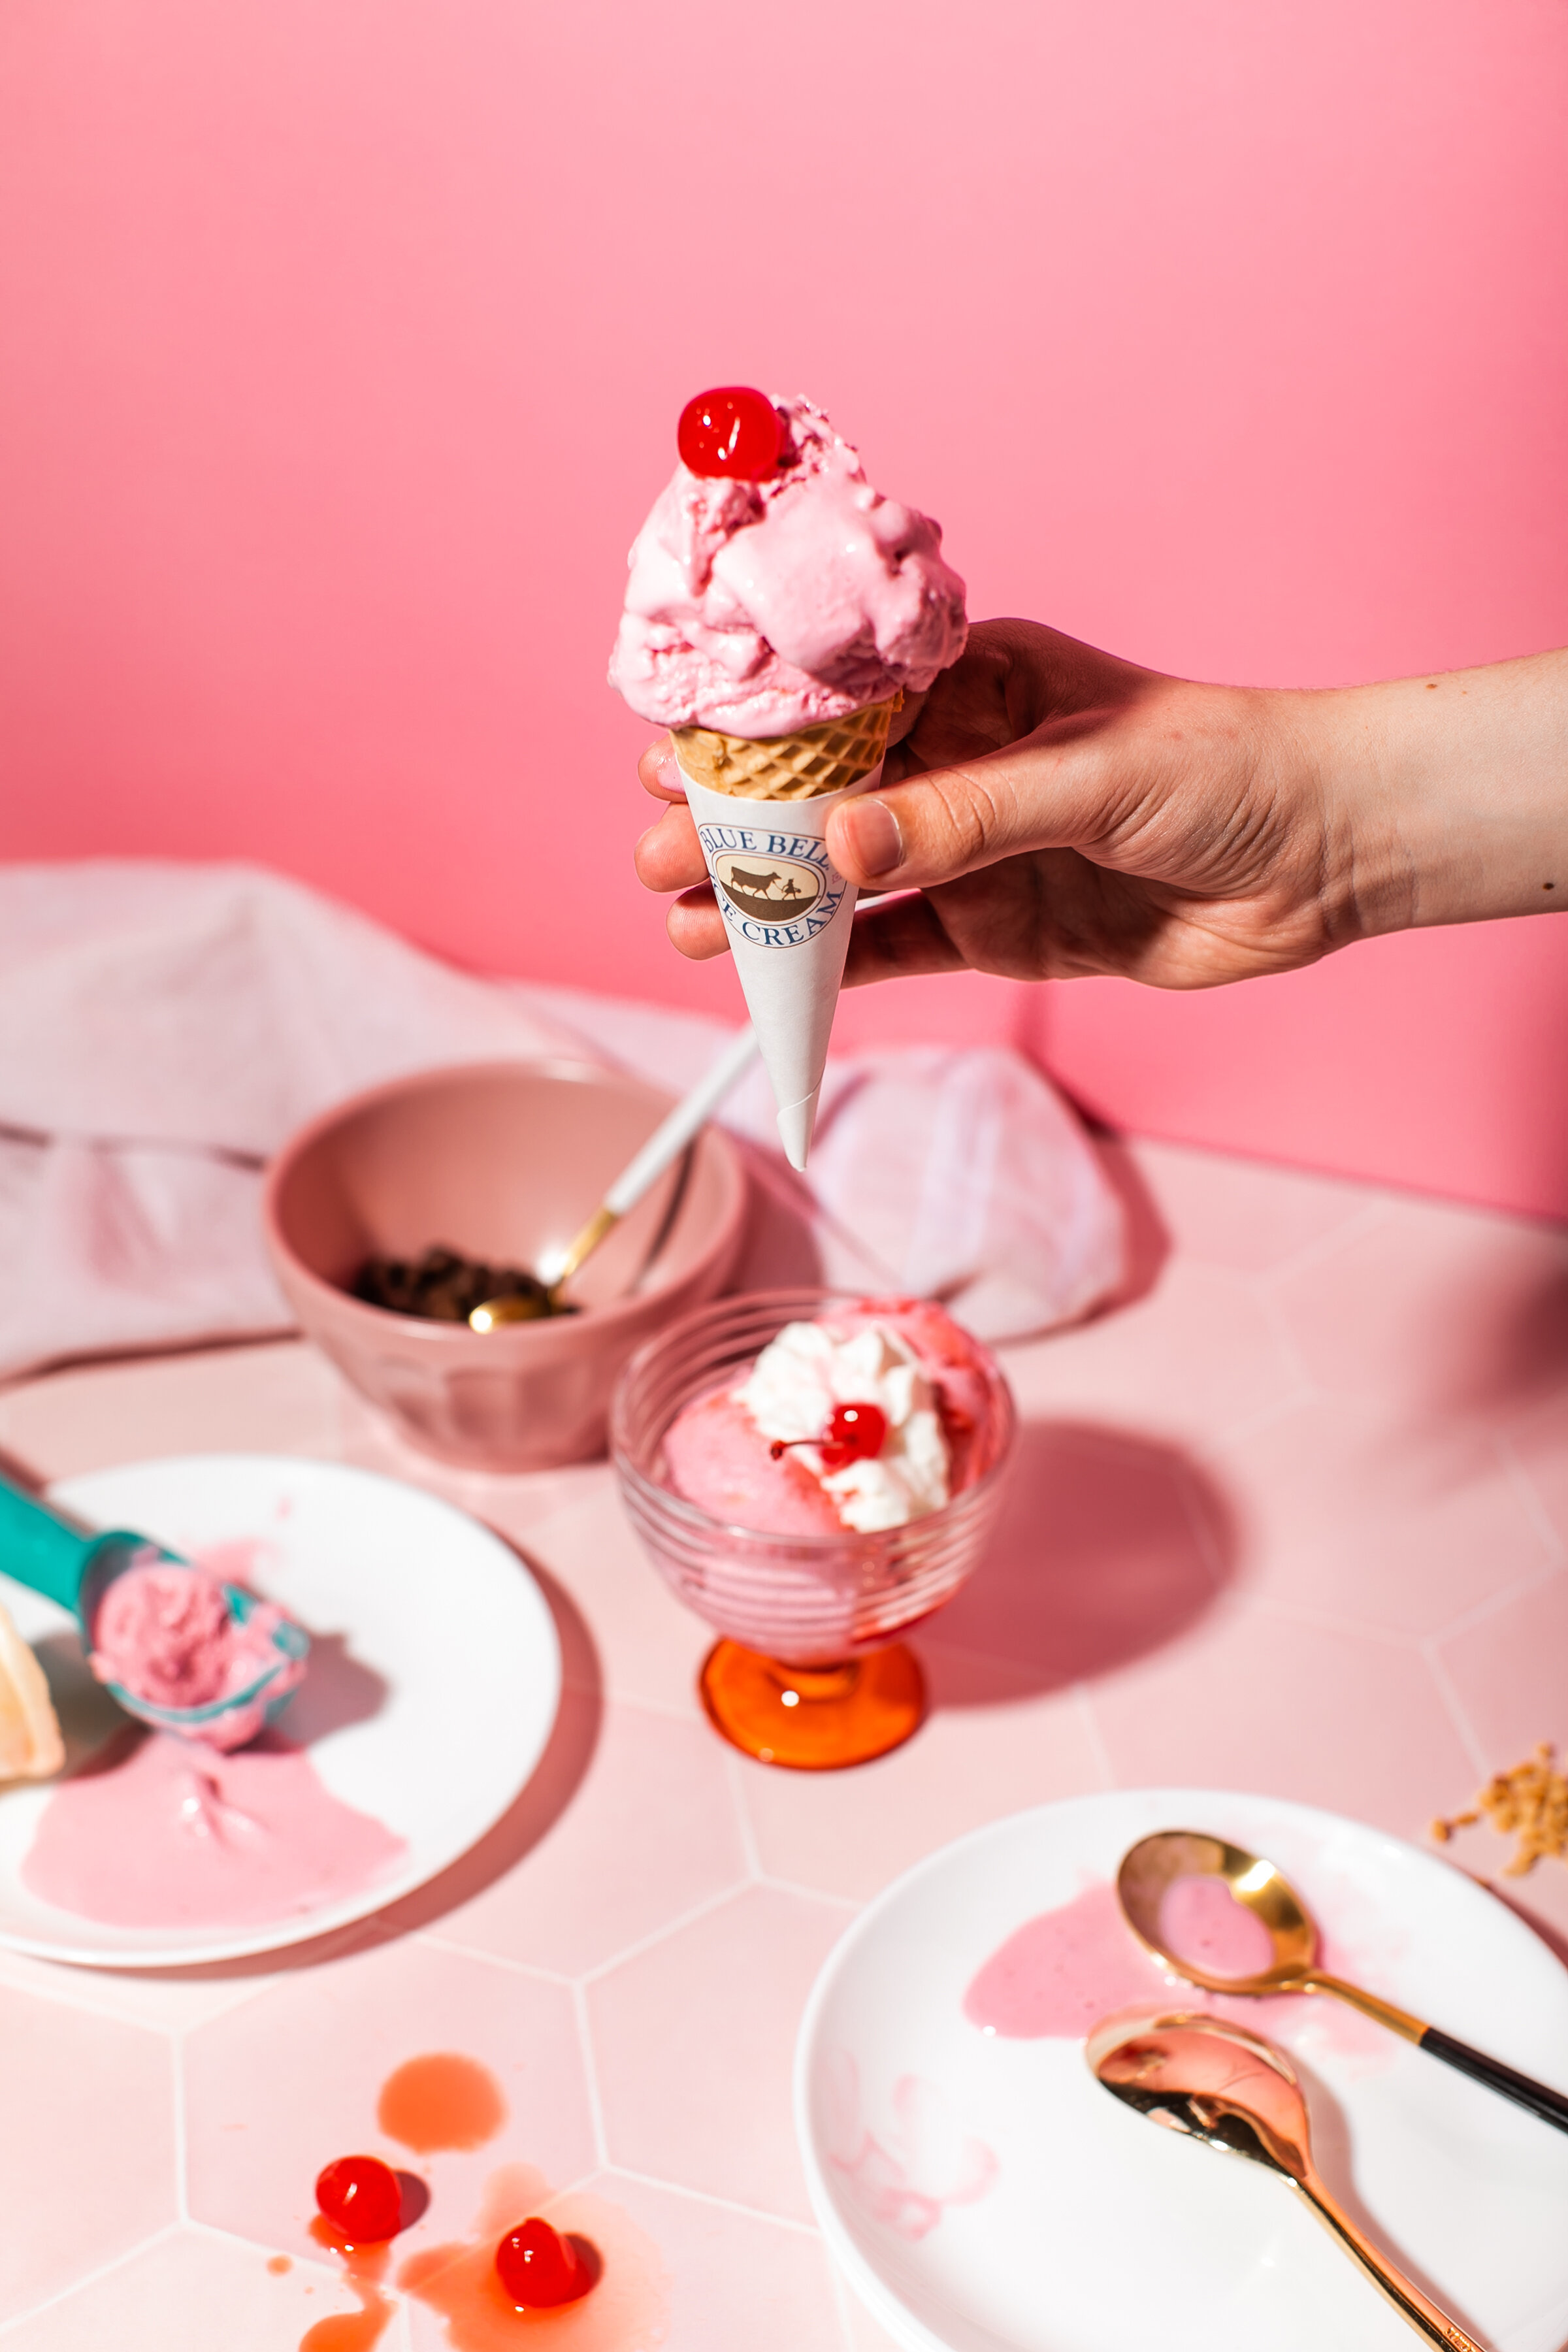
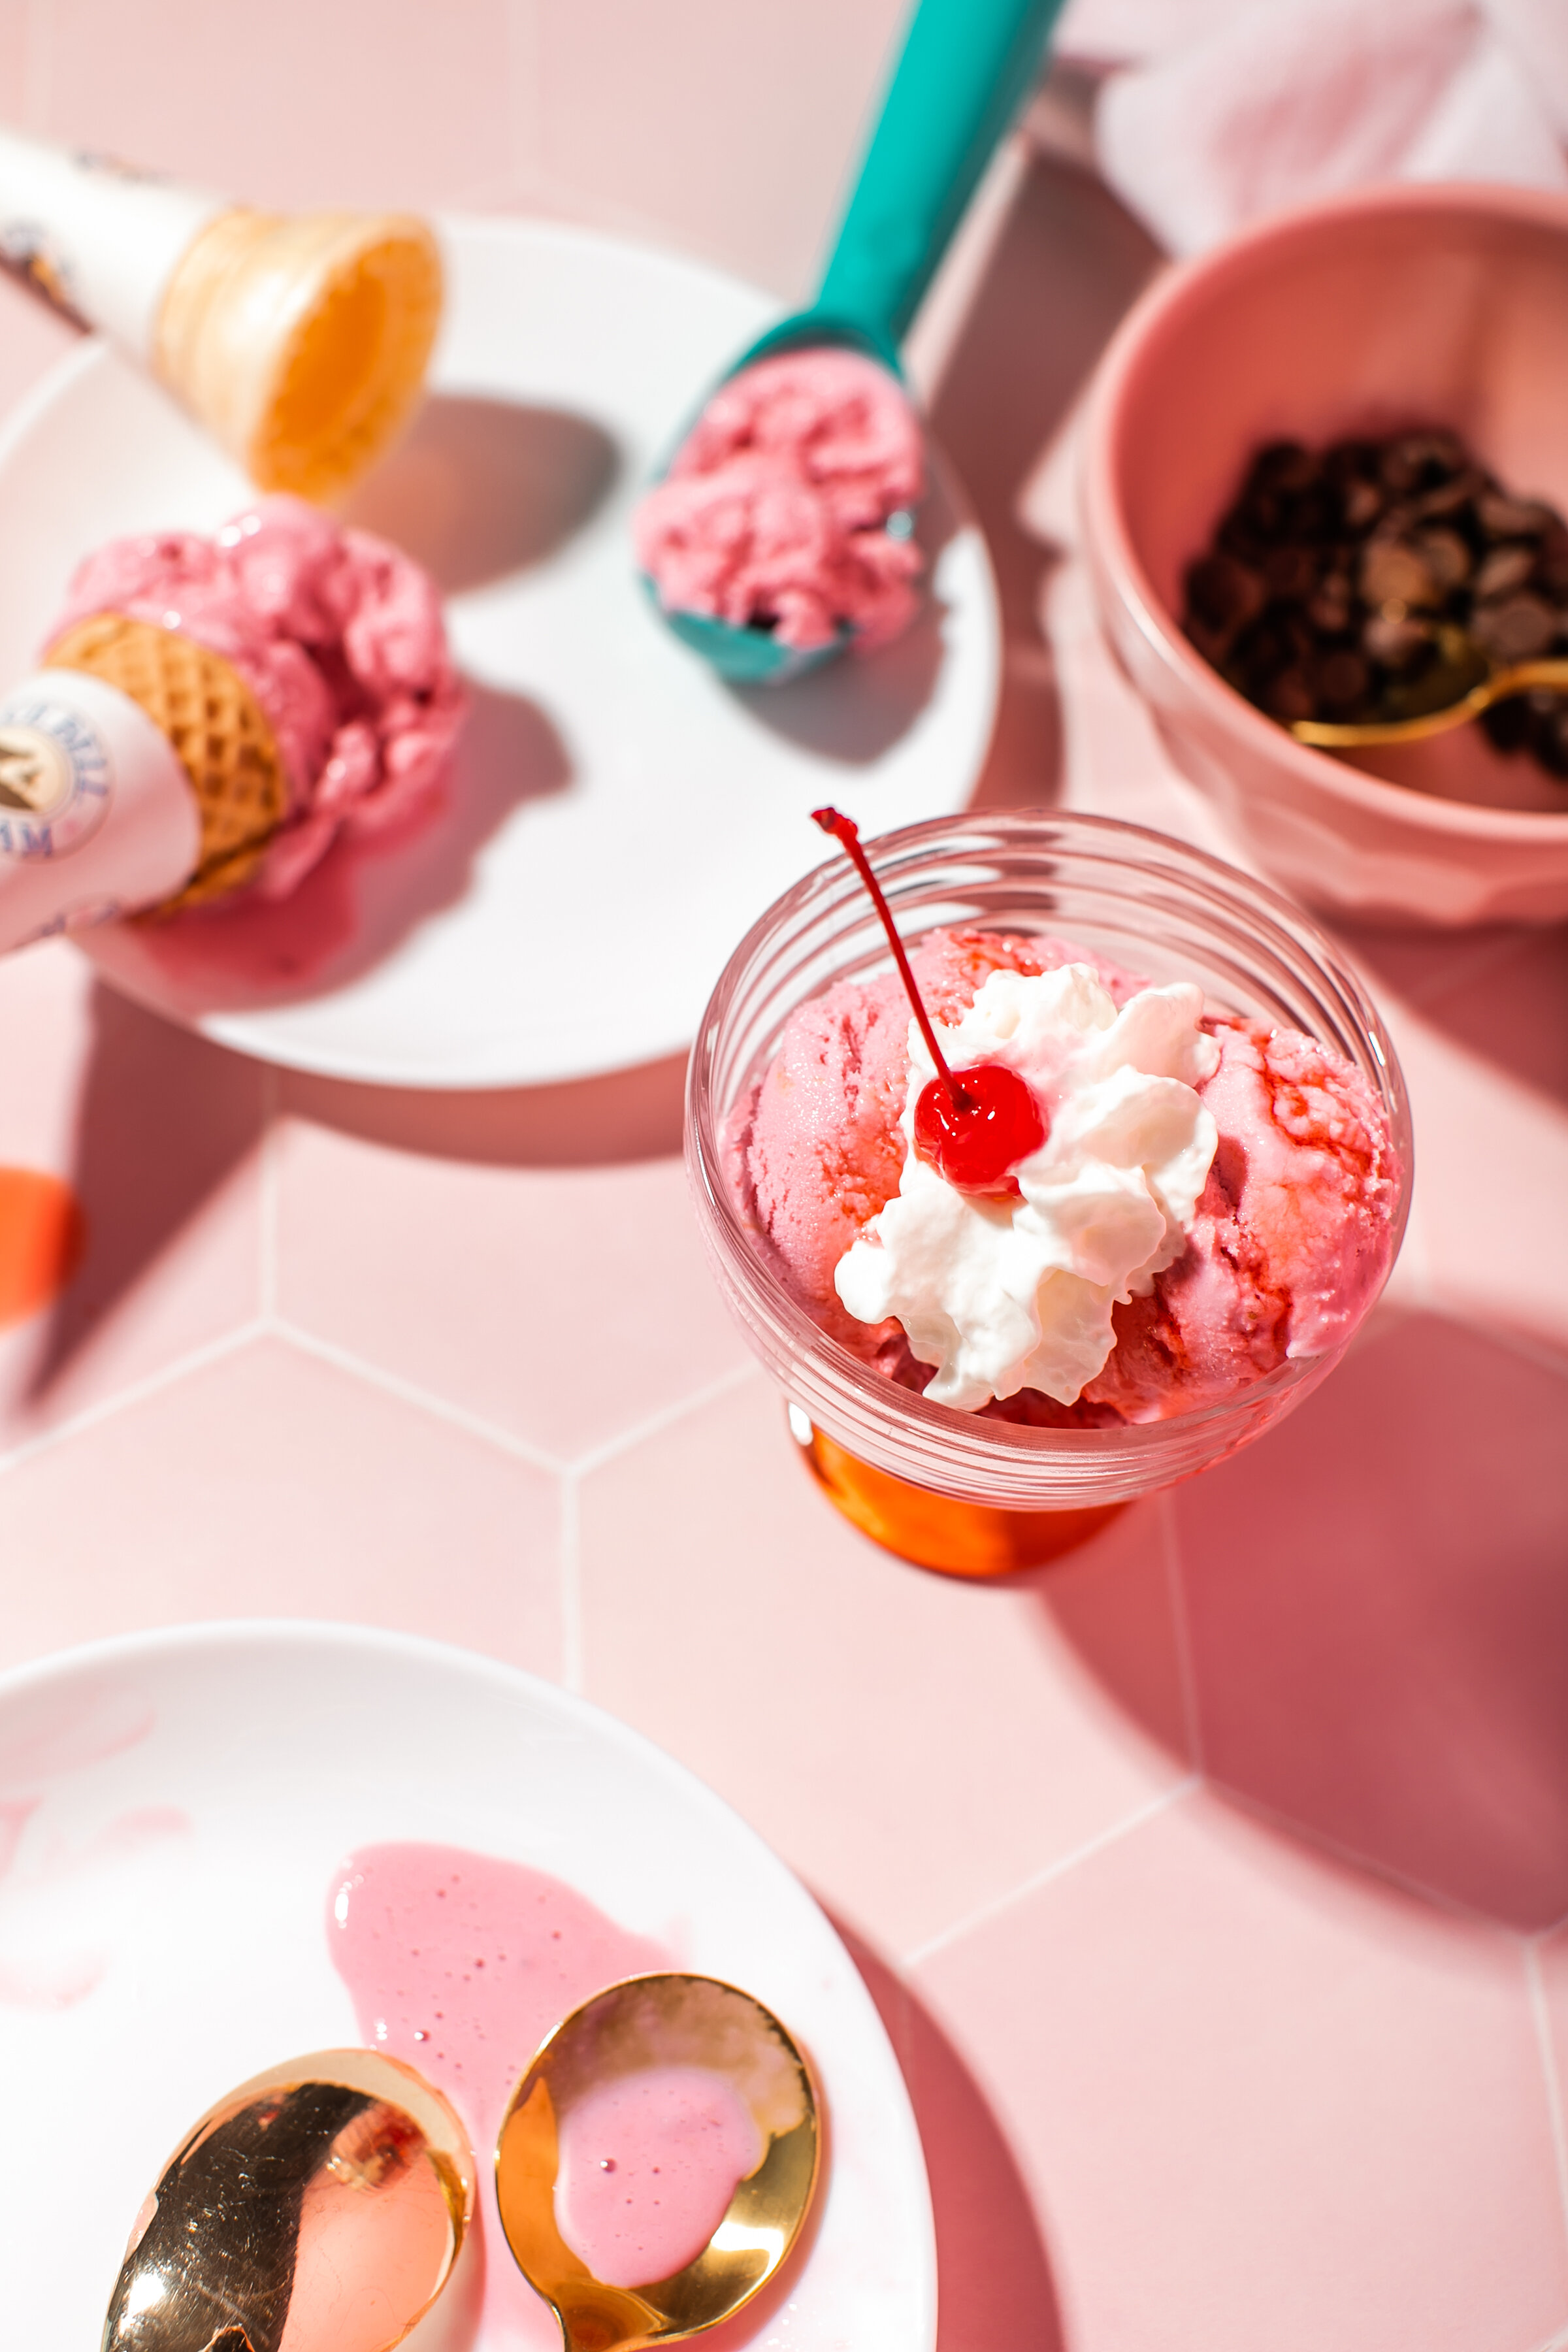
Honestly, that’s kind of what I hope for every time I shoot, but sometimes you are dealing with food that melts, loses form in seconds, products that don’t stay out, or the shoot gets rained out.
⠀⠀⠀⠀⠀⠀⠀⠀⠀
And I’m okay with it. All though frustrating sometimes, it challenges me to find a new route.
⠀⠀⠀⠀⠀⠀⠀⠀⠀
How are your expectations stacking up to reality lately?

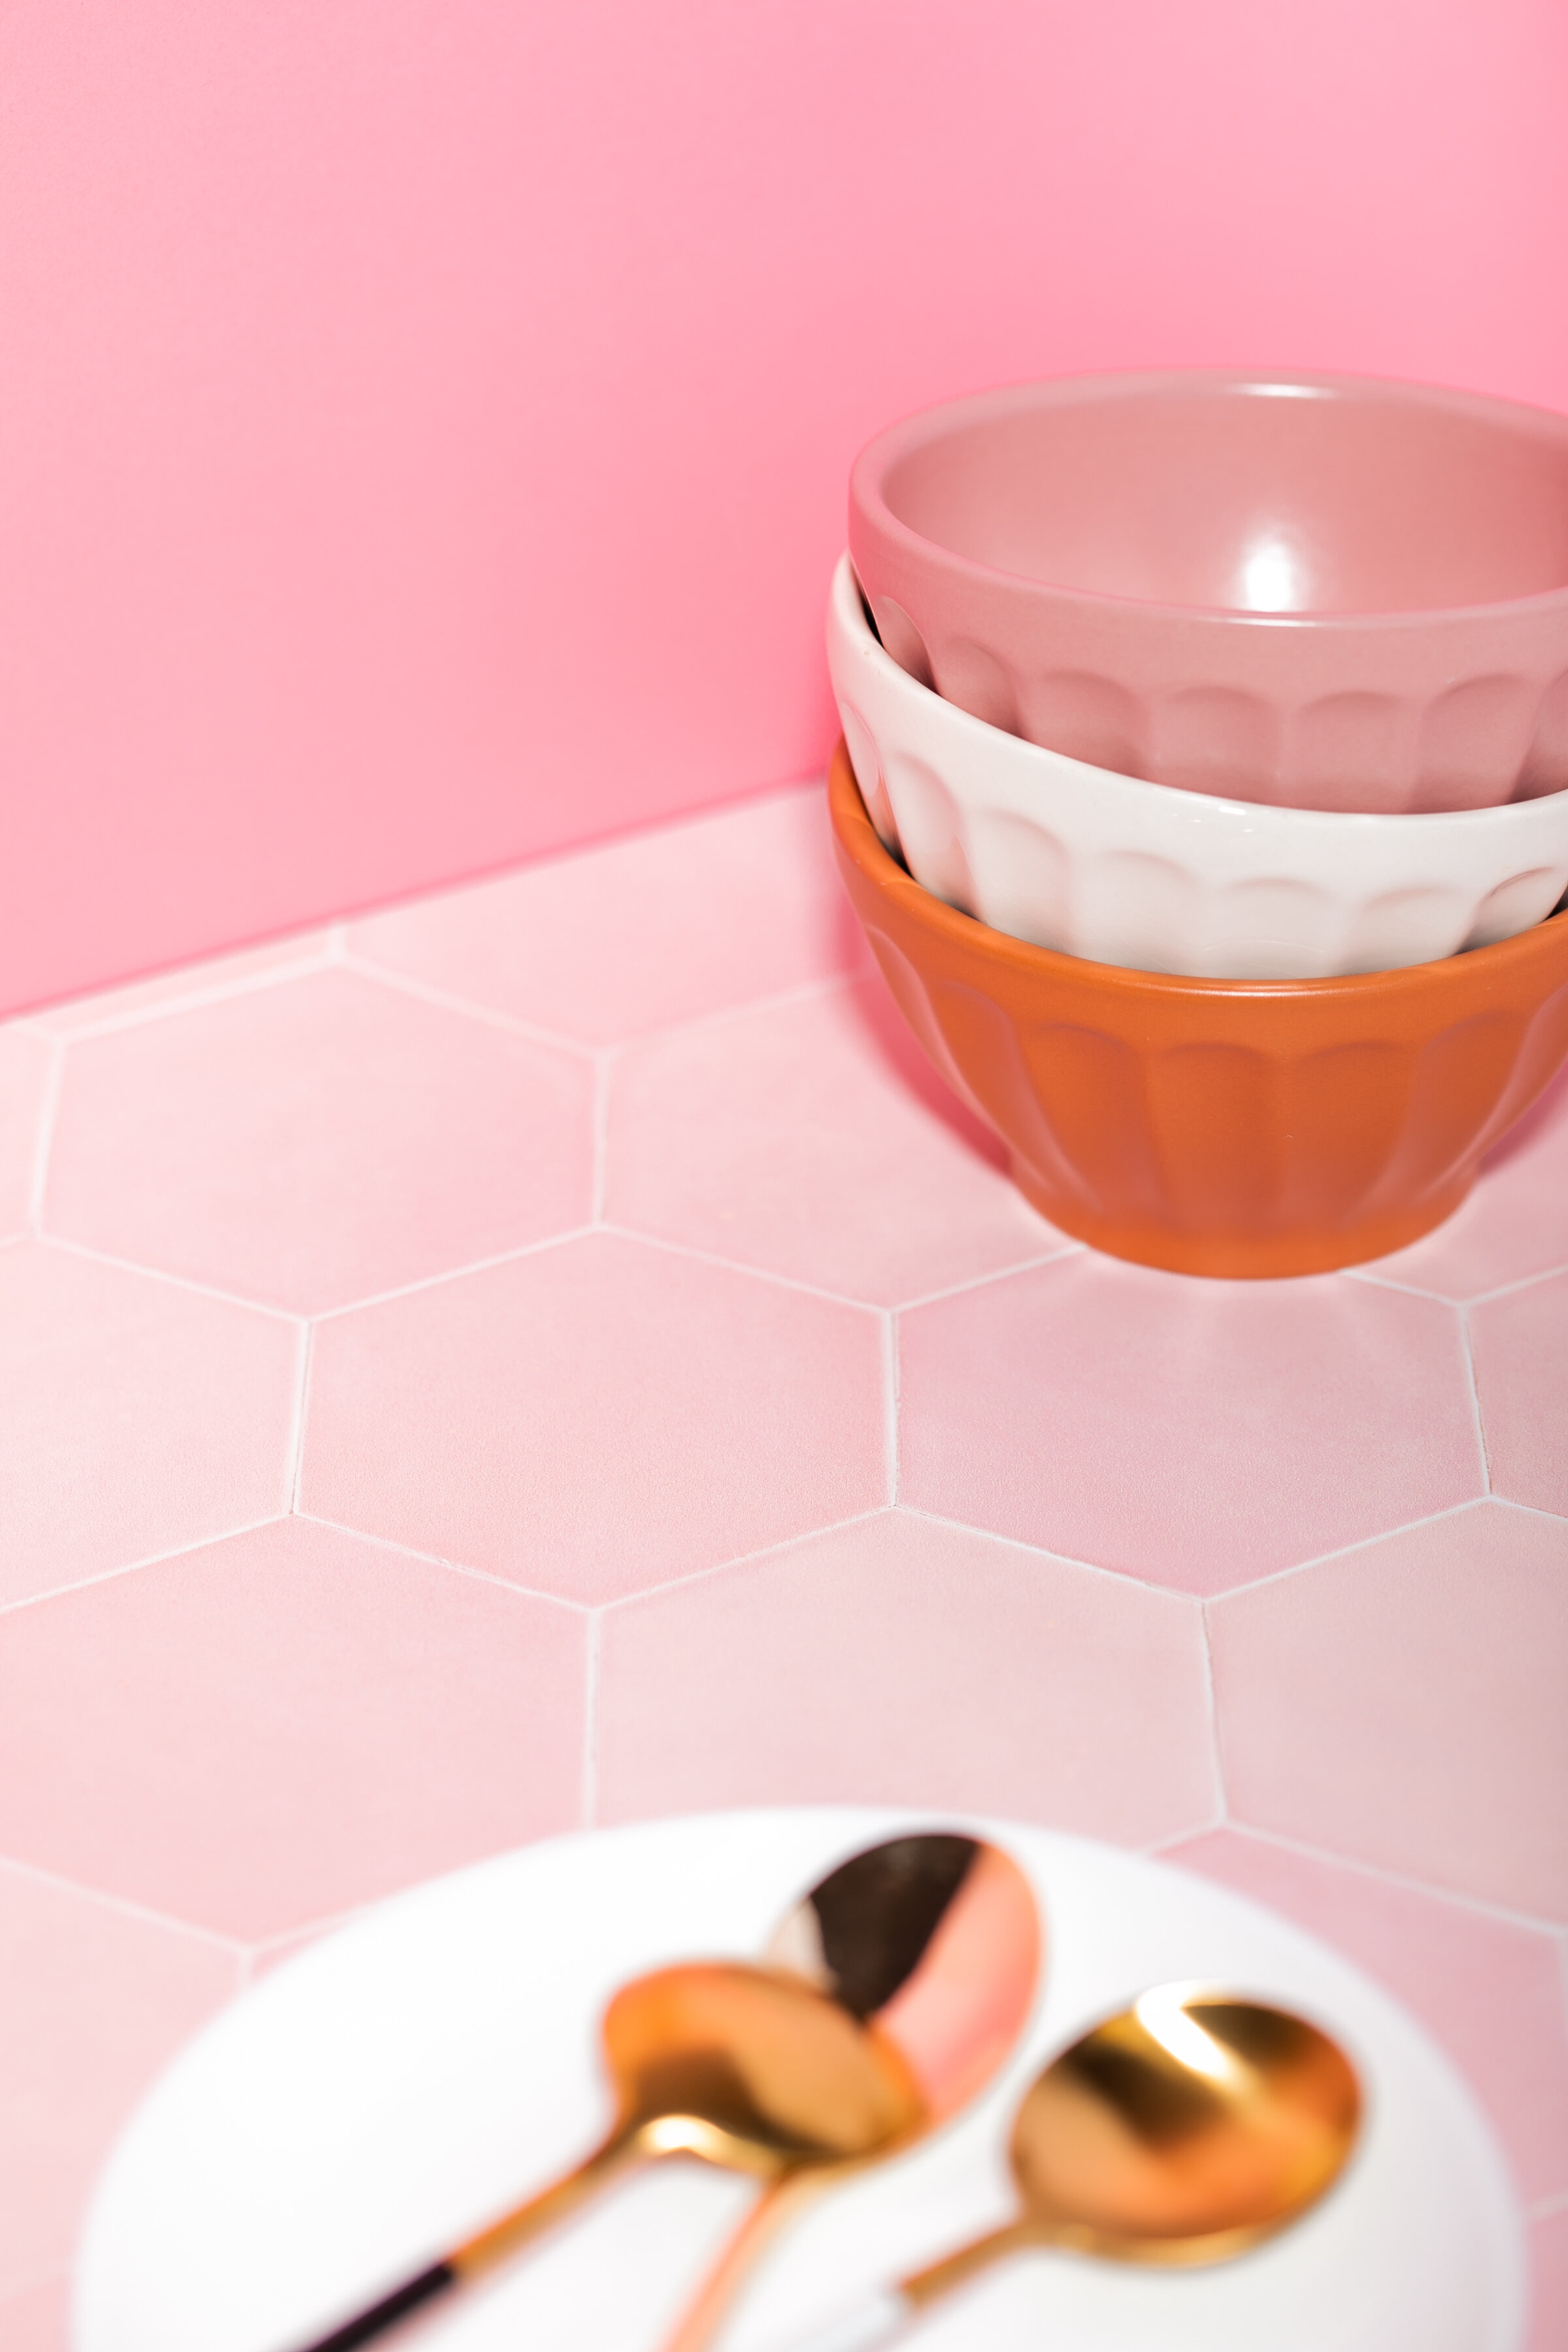
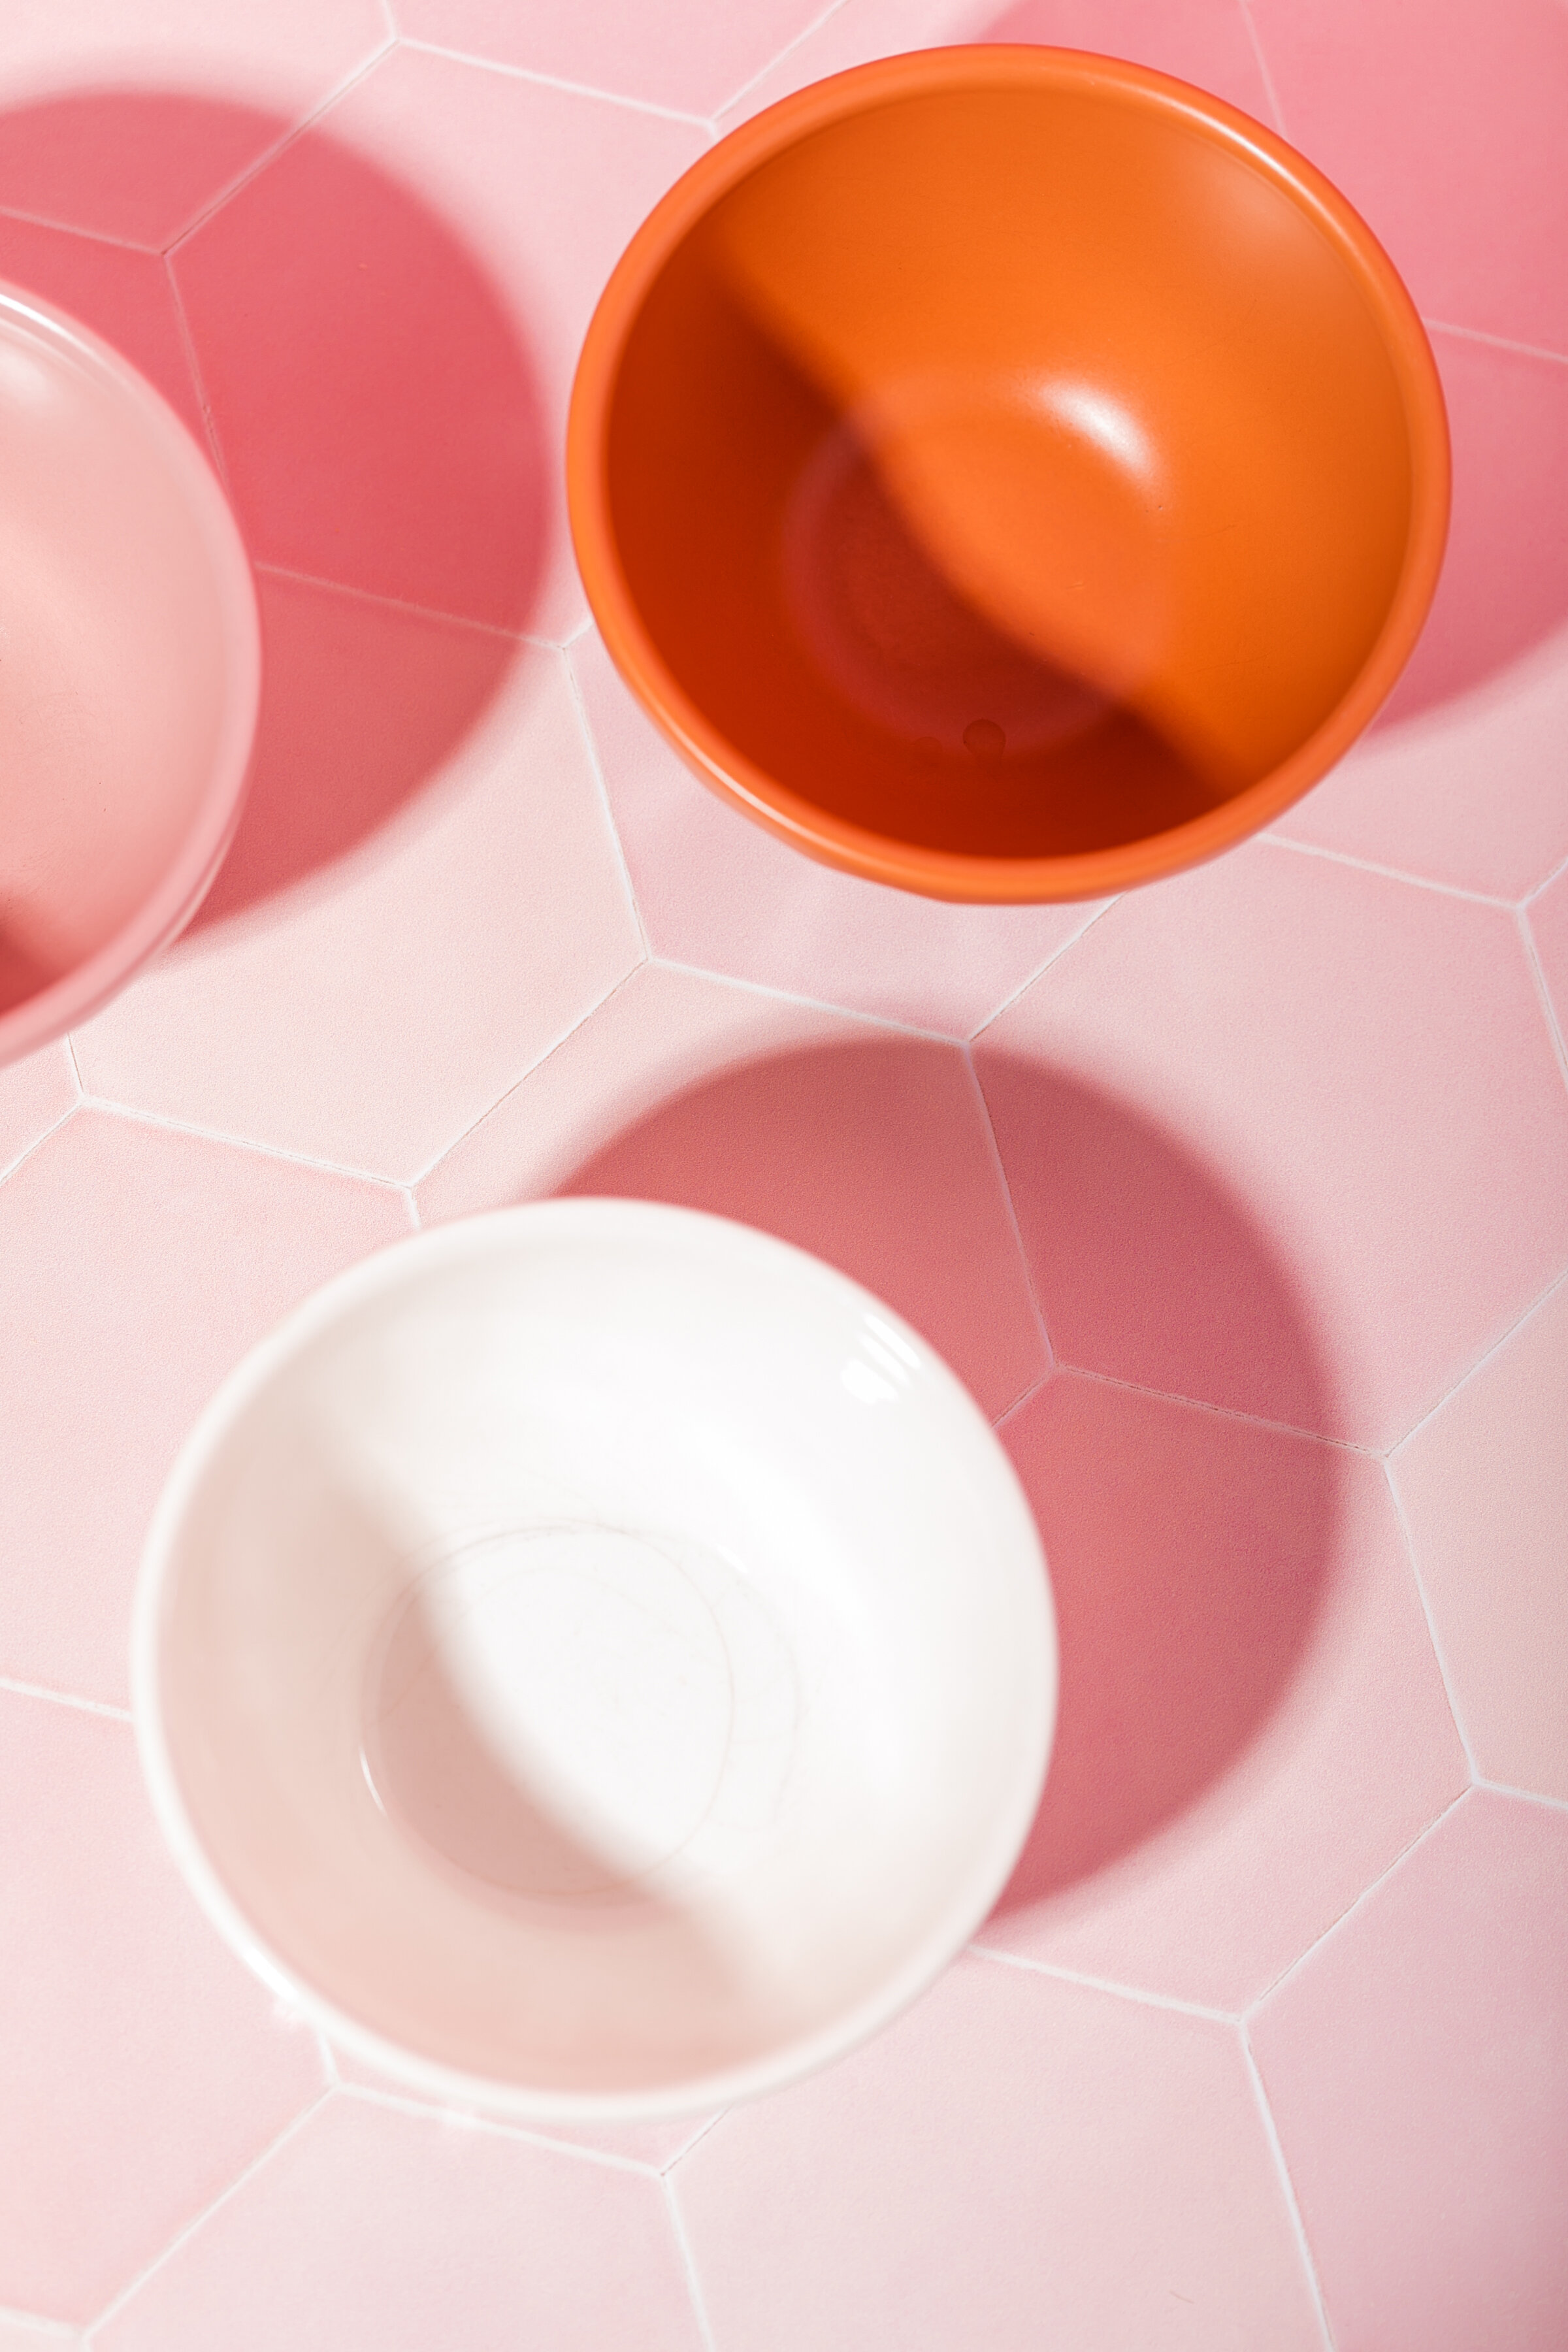
It’s been a fun summer so far photographing ice cream for a local donut shop. Yes, ice cream and donuts, what more could you ask for?

I’ve been exploring more studio light options, backdrops and thinking through all of the elements (start, middle, finish) a little more clearly and let me just say-magic is happening.

Comment

Loading Your Photos On Instagram...Don't Do This

When you load photos on Instagram, make sure you do the photo justice. Don't cut off limbs and make the photo incomplete.

In my college photography classes, the composition rule my professor taught us when photographing portraits was this: do not cut off limbs in your photo. More specifically, don’t crop where the joints meet.

For example, wrist to forearm, elbow to upper arm, ankle to leg, and knee to upper leg. If you crop parts of the body, do it in the middle of the arm, or middle of the thigh for example.

Cropping at the joints leaves the body incomplete. It makes the brain wonder where the hand or foot are. However, if you crop in the middle of the torso instead of at the hips, or middle of the forearm and not the wrist, it helps the brain see the body complete, knowing there is more outside of the frame.

This one tip can either make or break your picture (in my professional opinion) when posting on Instagram.

Did you know you can use a rectangle crop instead of a square crop when posting on Instagram?

How to make a rectangle crop on Instagram:

  • Select the plus sign at the bottom in the middle.

  • Select the picture that you want to showcase. As you select the picture and Instagram pulls it up, it shows it in a square form.

  • For this picture I’m showing you in the video, the picture is a full body, head to toe photo, so we need a rectangle crop.

  • Select the right angle icon at the bottom left. This will give the photo a fuller crop.

  • The new composition still crops off the feet.

  • This can be corrected by gently sliding the image up with your finger. Did you know you can do that you?

That’s it!!

Next time you post, try this out. Even if you use Planoly or other third party planners for social media, you can still apply this technique.

If you have any follow up questions, feel free give me a call or email me.

Cropping Guide (1).jpg

What Color Will You Wear For Your Next Photoshoot?

Planning your outfit for your next photoshoot?

I remember in my college photography classes learning about how certain colors look better on a person depending on your hair, eye and skin color.

This guide will help you think through the colors you will wear at your next photoshoot. All of these tips are of course a suggestion, but try it out and see if you agree :)

Behind the Scenes Product Shoot: Pure and Coco

Behind the scenes product shoot

Today I’m highlighting a product shoot I did with Pure and Coco.

They are a product subscription client, and send me their products from Washington.

For 2021, I will have the honor of doing a shoot for them each month.

I’m excited for each shoot, because they will challenge me to be more creative than the shoot before, which will result in inventive photos for my clients.

Are you a product based business and interested to hear more about how a subscription shoot works?

Whatever it is, the way you tell your story online can make all the difference.

Bloggers! Use these tips for your next photo shoot with your iPhone

When you are doing your own photoshoot at home, take note of these four tools to create product photos.

  1. Clamps

  2. Masking tape

  3. Wooden blocks

  4. Dumbbells

Whatever it is, the way you tell your story online can make all the difference.

Don’t just stand there! Revive Your Boring Poses

How do you revive your boring pose ideas when photographing portraits?

Add angles with your arms and legs.

When you do this, it creates movement to your photo and brings interest from your viewers.

Look at all of those triangles!

Try these poses out on yourself for a self-portrait or grab a friend and do a photoshoot.

Remember, practice makes perfect. So, don’t be discouraged if it doesn’t work right away.

Tell me, do you think you’ll try it?

Whatever it is, the way you tell your story online can make all the difference.

Three tools to use for better iPhone videos under $70

Videos are a must when sharing tips and tricks with your business. They are a great way to connect and get your information out to your viewers.

Here are three tools I recommend that are under $70.

Head to my Amazon store here to see more details.

  1. Mounted tripod ring light

  2. Selfie stick tripod with Bluetooth remote

  3. Portable clip-on ring light

What is white balance and why is it important?


Photography talk: What is white balance and why is it important?

White balance is how warm or cool the overall colors in your photograph look.

Sometimes your photos may look a little bit more blue when photographing in the shade.

Photographing early in the morning at sunrise or late in the evening at sunset, your photos can tend to be warmer (red) than you might like.

This is called a color cast and it happens because the color source of the light varies.

When shooting with your iPhone or Android, you can easily correct this with the white balance tool in the free Lightroom mobile app just like I’m doing in this video.

Follow along and let me know if you have questions.

Also, check out my stories today for more white balance tips.

Comment

Fancy Cowgirl

Who says you can’t have a tea party in the middle of your dairy with cows? Crystal, Liz and Ruby think it’s totally appropriate.

Crystal and her family are clients of mine who have turned to dear friends, and I am always inspired with their ideas for a photoshoot.

This idea was inspired from a recent request for Half and Half Magazine, featuring the families businesses-their dairy as well as their boutique shop, The Milkhouse Market.

Crystal and her mom, Liz wanted to put a spin on wife/mom/daughter dairy owners, creating the fancy cowgirl-look.

The theme: Feminine flair with pink dresses, pink velvet chairs and a milk-tea party surrounded by cows.

The cows were very interested and wanted in on the action. So cute, right?

Fancy Cowgirl Photoshoot by photography by Clovis, NM photographer Cristy Cross_0001.jpg
Fancy Cowgirl Photoshoot by photography by Clovis, NM photographer Cristy Cross_0002.jpg
Above: cows licking the milk container and eating flowers.

Above: cows licking the milk container and eating flowers.

Fancy Cowgirl Photoshoot by photography by Clovis, NM photographer Cristy Cross_0007.jpg
Fancy Cowgirl Photoshoot by photography by Clovis, NM photographer Cristy Cross_0006.jpg
Fancy Cowgirl Photoshoot by photography by Clovis, NM photographer Cristy Cross_0003.jpg
Fancy Cowgirl Photoshoot by photography by Clovis, NM photographer Cristy Cross_0004.jpg
Fancy Cowgirl Photoshoot by photography by Clovis, NM photographer Cristy Cross_0008.jpg
Comment

How to Style a Product Shoot

Styling for my clients product shoot is one of my favorite components I do for them.

Some things you have to think about before the shoot:

What is the clients objective? E-commerce (white photo background) or lifestyle photos?

What are the ingredients in the product? Knowing this will help you with prop ideas. Especially for this product, which was essential oils for Plant Juice Oils.

Know that the client will not always love the shots you love. They will love other photos, ones that you almost didn’t include in the gallery. And then you are thanking yourself for including them.

Brainstorm your set, colors, and material.

Use a variety of textures-smooth, rough, cotton, stones, plexiglass, silk, wood, balloons, etc.

Do your products include food related items? If so, use those for props. For example, sugar cookie essential oil mask spray for kids, use sugar real sugar cookies.

Also, have an actual list ready to go so it makes shooting a little easier, but also welcome spontaneous ideas.

Have any questions about how a product shoot works? I’d love to chat with you. Leave a comment below.

Essentional Oil Product photography by Clovis, NM photographer Cristy Cross_0011.jpg
Essentional Oil Product photography by Clovis, NM photographer Cristy Cross_0013.jpg
Essentional Oil Product photography by Clovis, NM photographer Cristy Cross_0021.jpg
Essentional Oil Product photography by Clovis, NM photographer Cristy Cross_0016.jpg
Essentional Oil Product photography by Clovis, NM photographer Cristy Cross_0012.jpg
Essentional Oil Product photography by Clovis, NM photographer Cristy Cross_0019.jpg
Essentional Oil Product photography by Clovis, NM photographer Cristy Cross_0020.jpg
Essentional Oil Product photography by Clovis, NM photographer Cristy Cross_0014.jpg
Essentional Oil Product photography by Clovis, NM photographer Cristy Cross_0015.jpg

What is a preset, and what does it do?

What is a preset, and what does it do?
⠀⠀⠀⠀⠀⠀⠀⠀⠀
To some, they are magical and life changing.
⠀⠀⠀⠀⠀⠀⠀⠀⠀
I for one am one of those people.😂
⠀⠀⠀⠀⠀⠀⠀⠀⠀
Every single day I edit photos on my computer or phone, I use presets to enhance my photographs.
⠀⠀⠀⠀⠀⠀⠀⠀⠀
A preset is a recipe of ingredients used to make a good photo look great. It’s ingredients consist of adjustments on exposure, contrast, cool or warm temperatures, green or pink tints, deep shadows, or bright backgrounds, luminance and hues, etc. My favorite presets to use are CC Mobile Presets.
⠀⠀⠀⠀⠀⠀⠀⠀⠀
Each preset works differently. Some are made to brighten a dark photo. While others focus on enhancing colors, increasing contrast and lowering the exposure.
⠀⠀⠀⠀⠀⠀⠀⠀⠀
Depending on how your photo was taken, will depend on which preset will look best for your final edit.
⠀⠀⠀⠀⠀⠀⠀⠀⠀
Adding a preset to a dark photo that was meant to bring back highlights (making highlights darker) would end up making the entire photo darker.
⠀⠀⠀⠀⠀⠀⠀⠀⠀
Or, using a bright preset (raising exposure) to an already bright photo, would make your photograph overexposed (too bright).
⠀⠀⠀⠀⠀⠀⠀⠀⠀
These are just a couple tips on using presets. Stick around and I’ll share more in the future or feel free to check out after/before photos at CC Mobile Presets on Instagram.
⠀⠀⠀⠀⠀⠀⠀⠀⠀
Do you have any questions about presets? Leave your questions in the comments section and I’ll dive deeper into them.

After editing the photo below, I went one step further to change up my creative game by flipping the photo.

Top photo: After, Bottom photo: before

Brand photography by Clovis, NM photographer Cristy Cross_0009.jpg

Left: After, Right: Before

Brand photography by Clovis, NM photographer Cristy Cross_0010.jpg

Are you more the ‘life of the party’ or ‘table for one?

Brand photography by Clovis, NM photographer Cristy Cross_0001.jpg

Are you more the ‘life of the party’ or ‘table for one?
⠀⠀⠀⠀⠀⠀⠀⠀⠀
I think I’m at my most productive when my favorite Spotify station is playing and I'm working by myself. It helps me stay on task, but I also love to work in a group and surround by the buzz of busy people.

This week a brand new co-working space is opening up downtown and I am so excited. A co-working space is great for people who usually work from home, but would like to have a change of scenery for their workspace. It can also be the place to work when you don’t have a home office at all.

The Firehouse Workspace has many things to offer, including a podcast studio, conference room, and photography studio among private offices to rent and open seating desks.

What are benefits of a co-working space?

-Meeting new people

-Possible collaborations to grow your business

-Office parties, which is so fun when normally you are a solo entrepreneur

-Water cooler talk :)

-Office comradery


Have you ever been interested in working in a place like this?

Brand photography by Clovis, NM photographer Cristy Cross_0003.jpg
Brand photography by Clovis, NM photographer Cristy Cross_0002.jpg
Brand photography by Clovis, NM photographer Cristy Cross_0005.jpg
Brand photography by Clovis, NM photographer Cristy Cross_0004.jpg
Brand photography by Clovis, NM photographer Cristy Cross_0008.jpg
Brand photography by Clovis, NM photographer Cristy Cross_0007.jpg
Brand photography by Clovis, NM photographer Cristy Cross_0006.jpg
Co-working Workspace.png

Hey Mom! What Do You Wear for Your Next Family Session?

A friend recently asked me to share “what to wear” for family sessions and these are my top recommendations that I give to my clients.

Take note and save this so you can come back to it for your next family session.

What outfit do you love most?
For me, it’s the oversized sweater and pleated shirt. It just screams beautiful-cozy.

what to wear for family session ideas

Do You Want To Look Good On Social Media?

Planning for social media is a battle when you don’t have a picture to post. Am I right?
⠀⠀⠀⠀⠀⠀⠀⠀⠀
Let me help you out! Grab your five free organic and nature inspired stock photos to plan out your social media content. Click the photo below and enjoy!

How can I use stock photos?

  • Instagram and Facebook posts

  • Newsletters

  • Slideshow presentation

  • Ebook

  • iPhone Wallpaper

  • Instastories background with quote

  • Load in Canva and add text box

Food Photography | Cherry Pie

PRODUCT PHOTO SHOOT: Cherry Pie

By using my iPhone, good window lighting, filler light (poster board), and simple editing, I can create a professional photograph in under 5 minutes.
Follow these steps on the video and try it out yourself!

All edits were done using CC Mobile Presets. Simple and easy to use for product or service based businesses.

Food photography, apple pie by Clovis, New Mexico photographer Cristy Cross_0001.jpg
Food photography, apple pie by Clovis, New Mexico photographer Cristy Cross_0003.jpg
Food photography, apple pie by Clovis, New Mexico photographer Cristy Cross_0002.jpg
 

Brand Photography

CURRENTLY BOOKING BRAND SESSIONS
⠀⠀⠀⠀⠀⠀⠀⠀⠀
Please hear this with magnificent passion.
⭐️I LOVE MY JOB⭐️
I can’t stress it enough.
⠀⠀⠀⠀⠀⠀⠀⠀⠀
Every time I photograph entrepreneurs we talk about their dreams, my dreams, and then we encourage each other to keep going and taking steps towards those dreams.
⠀⠀⠀⠀⠀⠀⠀⠀⠀
Let me help you get started on your dream. First step is writing them out.
⠀⠀⠀⠀⠀⠀⠀⠀⠀
Write one of your dreams in the comments below. Once you put it out there, you are one step closer to reaching that dream.

Brand Photography byClovis, New Mexico photographer Cristy Cross_0013.jpg
Brand Photography byClovis, New Mexico photographer Cristy Cross_0014.jpg
Brand Photography byClovis, New Mexico photographer Cristy Cross_0015.jpg
Brand Photography byClovis, New Mexico photographer Cristy Cross_0016.jpg
Brand Photography byClovis, New Mexico photographer Cristy Cross_0017.jpg
Brand Photography byClovis, New Mexico photographer Cristy Cross_0018.jpg
Brand Photography byClovis, New Mexico photographer Cristy Cross_0019.jpg

How Can You Be Your Own Brand Photographer?


Do you need bio or profile photos quickly, but don’t have time to hire a professional photographer?

I know as a business owner sometimes you need a great headshot, but you are in a time crunch and can’t hire a professional photographer. So for you, I created a simple selfie tutorial.


You will learn how to look for good natural lighting and which lighting to stay away from. I’ll also give you tips on the best camera angle and help you find your favorite side/angle of your face. (You know you have a favorite. We all do.)

Do me a favor. Right after you watch it, go and take 5 minutes to practice. Don’t feel vain. Feel beautiful/handsome, amazing, and confident.

Learning how to take a better selfie will not only get you a great profile shot for social media or a sweet photo to send to your special someone, but it will also help you love yourself more.

Confident Portraits by Clovis, New Mexico photographer Cristy Cross_0002.jpg
Confident Portraits by Clovis, New Mexico photographer Cristy Cross_0004.jpg
Comment

3 Major Steps To Take In Creating Authentic Family Photographs

How do you create authentic family photos?

At the time of booking:

When you first book a family portrait session, send the family a questionnaire. Ask questions that helps you get to know them a little bit better. Questions like, what each family members favorite candy is, or favorite drink at Sonic. These simple questions give you a small insight to their personality, but also allows topics to talk about when you take their pictures.

Day of the session:

First things first. When the session first starts, make some small talk. Be observant when doing the small talk thing. Watch their mannerisms, smiles, touches, and the candid way they stand with their arms folded and hands in the pockets.

If you are photographing them at their home, this creates a comforting atmosphere. Everyone, kids and husbands included, open up a little more than they would in a public location.

However, if you are doing the session at a park, or your local downtown area, give them an action.

Tell them to group up, then gradually watch how their arms fall on each other. If they don’t, direct them a little bit and make a connection between each other.

How to create multiple poses/photos in one setup:

While everyone is in the group, here is a shot list you can use. Keep in mind to work around your subjects.

  1. wide group shot of everyone smiling (safety shot, not as heartfelt, but safe)

  2. close-up group shot

  3. close-up of each person, without anyone moving. Examples are below. Kids might have their arms intertwined in moms arms, or mom might be running her hand through her children’s hair. Again, if they are currently doing them, coach them and direct them through it and make them do an action. It will look authentic and lead to something beautiful.

  4. Photograph the connections. Not just the faces, but also the arms and hands holding one another.

While you are there to photograph the family, don’t forget to snap some of mom and dad. Take a look at these cuties below.

Have any follow up questions. I’d be happy to help. You can email me at cristy@cristycross.com or leave a comment on this post.

*Pin these photos and add them to your Pinterest boards for inspiration.

The Desert Family Photography Session by Clovis, New Mexico photographer Cristy Cross_0001.jpg
The Desert Family Photography Session by Clovis, New Mexico photographer Cristy Cross_0002.jpg
The Desert Family Photography Session by Clovis, New Mexico photographer Cristy Cross_0003.jpg
The Desert Family Photography Session by Clovis, New Mexico photographer Cristy Cross_0004.jpg
The Desert Family Photography Session by Clovis, New Mexico photographer Cristy Cross_0005.jpg
The Desert Family Photography Session by Clovis, New Mexico photographer Cristy Cross_0006.jpg
The Desert Family Photography Session by Clovis, New Mexico photographer Cristy Cross_0007.jpg
The Desert Family Photography Session by Clovis, New Mexico photographer Cristy Cross_0009.jpg
The Desert Family Photography Session by Clovis, New Mexico photographer Cristy Cross_0010.jpg
The Desert Family Photography Session by Clovis, New Mexico photographer Cristy Cross_0011.jpg
The Desert Family Photography Session by Clovis, New Mexico photographer Cristy Cross_0012.jpg
The Desert Family Photography Session by Clovis, New Mexico photographer Cristy Cross_0013.jpg
The Desert Family Photography Session by Clovis, New Mexico photographer Cristy Cross_0018.jpg
The Desert Family Photography Session by Clovis, New Mexico photographer Cristy Cross_0016.jpg
The Desert Family Photography Session by Clovis, New Mexico photographer Cristy Cross_0019.jpg
Dark Orange Women's Fashion Tips Pinterest Graphic.png

Aperture | Basic Photography

Aperture Edition | basic photography

Some things to think about when learning how to shoot in manual with your digital single lens reflex camera (dslr):

-Keep your shutter no lower than 1/100.  This will help prevent blurry or shakiness in you photo from motion happening either from the photographer slightly moving, or your subject moving fast. Ideally, if your subject is moving fast, your shutter would need to be around 1/200 to insure your subject isn’t blurry as well.

-Play around with your ISO.

-Change your f-stop/aperture.  Get comfortable playing around with your settings.

-Shoot a variety. Walk around your subject and shoot from all directions.

-Photograph subjects near and far, shade, and in the sun. 

-Photograph different types of subjects.  For example, portraits, landscape, and action shot. 

-You can also photograph still life.  For example- a wooden chair, flowers, books, bike, car, makeup, pottery, etc.

**Let me also say, you can photograph inside, but only with a good source of natural light.  For example, bring your subject next to a window and use the window lighting. When you are first learning photography, it is easiest for you to shoot with natural light.

Keep a journal of the lenses you are using, the focal length (18mm, 50mm, 75mm, etc), shutter speed, aperture, iso, sun, shade, etc.

What does aperture affect_ (1).jpg
1.jpg

DIY Christmas Felt Garland

Garland Decor for Your Artwork s by Clovis, New Mexico photographer Cristy Cross_0001.jpg

An easy way to make your Christmas décor festive, without spending too much money is by using these two items: felt and hemp string (or any other string you have around the house.)

Felt is such a forgiving craft material and I love creating with it, and so do my kids!

Garland Decor for Your Artwork s by Clovis, New Mexico photographer Cristy Cross_0002.jpg

You can hang the garland over your mirror, artwork or mantel.

Garland Decor for Your Artwork s by Clovis, New Mexico photographer Cristy Cross_0003.jpg

Instructions:

Head to our local craft store, and select your colors

Cut felt pieces to 1 inch-1.5 inch x 8 inch strips for each color.

The amount of strips will depend on how long you want your garland to be.

Tie each strand onto the string. As you gather more and more pieces of felt on the string, push them together so your garland will be full of volume.

Garland Decor for Your Artwork s by Clovis, New Mexico photographer Cristy Cross_0005.jpg
Garland Decor for Your Artwork s by Clovis, New Mexico photographer Cristy Cross_0006.jpg

I’ve made a tutorial video for you too! Take a look and enjoy.

Watch below!